Welcome to Sandra Scrap Creaties!

donderdag 29 april 2010

Q is for Quilling! ...tutorial included!

I'm so proud to show you these hybrid cards I made a few weeks ago for Kaisercraft. Finally I can say 'Q is for Quilling!' because these cards show three different quilling techniques.
For the three cards below I used the Flutterby digital kit:
For first card with the big poppy I used a quilling technique called husking. This technique is about creating figures by threading paperstrips around pins. Lots more about this technique will follow in this blogpost so keep reading!! I printed the flower-frame element again, now in full color, cut it out, inked the edges and glued it with some foamtape on my card. I attached the quilled poppy on top of it and finished my card with a black line around it. 
For the second card I used the paperstrips in a different way, now by tying a sort of knot in them while wrapping them around my card. I cut two circles out of my card first. Then I used 14 paperstrips and attached them on the inside of the card in between the two circles. The 14 strips are split in two bundles of 7 strips when they come out of the upper circle and ‘tied’ in a graceful knot. I printed some of the butterflies from the Flutterby kit, cut them out and attached them on the card.

For the third card with the flourish and the flowers, I used the ’side flourish’-element from the Flutterby kit, digitally erased some parts to make room for my own flowers and printed this on a white Kaisercraft card. I quilled some flowers in different sizes and glued these on the card. I also printed a brush with the text ‘For You’ on the card”. This quilling technique is probably the one that is the most well known: rolling paperstrips and pinching the rolls in all sorts of shapes.

I liked the results of the card with the husking technique so much that I made another two cards with it.
And even better...I made a step-by-step instruction about how I did it! (Keep reading...this is going to be a mammoth sized blogpost!)
First I will show you my card:


The background of the card is a paper from the Candyshop kit. The text circle is a brush also, from the Circles brush kit. I erased the edges and the inner part (so the only thing left was the text itself ) and printed this together with the background paper.
Do you want to know how I made the butterfly? Here it comes...step by step!

What do you need to get started?

-Metal pins
-A cork board
-1/8 inch (3mm) wide paperstrips
-Adhesive (I use Tacky Glue and this works fine)
-Scissors
- paper piercer
First, something about which paper to use. There are special quilling paper strips for sale, in different sizes and colors. You can try at your LSS or google on the internet. You can also cut colored construction paper from the children’s craft department or even use printer paper . The paper has to be a little bit thicker than copy paper, but not too thick because it will not be flexible enough and the strip will possibly crumple.
About the cork board: I use the backside of a special quilling board. If you don’t have a board like that you can use a piece of cork or thick foam. Anything that is flat and where you can stick the pins in without the pins falling down. (You might want to cover the board with some plastic wrap or something to prevent your work from sticking to the board after wards.)
Next thing you need is a pattern of a butterfly. I used a brush from the Flutterby digital kit for this one. I printed it on white copy paper in the size I want my final butterfly to be.
Place the print on your cork board and start piercing pins on the outlines of the upper part of the wing (marked with the red dots).
Make a tiny loop at the end of a paperstrip and stick a pin through it.

This will be your starting point: pin 1.
Wrap the strip around pin 2, put a little drop of adhesive where it touches the loop around pin 1 and glue the strip down.
Next, you wrap the strip around pin 3, marked with a green arrow on the picture. Glue it down again where it touches pin 1 and go on to pin 4, etc.
Continue making these loops and switch sides after each pin. Don’t forget to put a little drop of adhesive each time your strip touches pin 1.
After you wrapped the strip around the last pin, glue the end down at pin 1 and cut off the rest of the strip.
Take another paper strip..if you wish in another color…and repeat the previous steps to create the lower part of the wing. See also the green dots, marked in the first picture!

To fill the open space between the two parts you need to create a teardrop.

Roll up a piece of a (black) paper strip.( I rolled it around the point of my paper piercer. You can also use a toothpick.) Carefully, pull the roll off , put it on your workspace and release it to unroll a little bit. Glue the end of the strip and let it dry for a moment.
To create the teardrop, simply pinch it on one side.

The next step will be to put together the two parts of the wing and the teardrop.
Take another paper strip and glue it to pin 1. Wrap the strip around all the pins. Make sure you put a drop of adhesive where the strip touches the pins.
You may have to hold it for a while to let it dry, before you can move on to the next pin. My paper piercer was very handy at that moment!
When you’re done your first wings should look like this:

Repeat these steps to create the other wing.

To create the body of the butterfly I cut two strips of about 1 cm wide, made a roll of each strip and glued the end of the strip to the roll. (Don’t release the rolls this time before adding the glue!) I pushed the inside of the roll carefully out to create a cone. Give the cones some time to dry and glue them together.

For the antennas of the butterfly I used a plastic stamen, which I colored with a black marker. Fold it in half and glue it on top of the body.

The last step to complete your butterfly is to glue the wings to the body..et voilĂ !

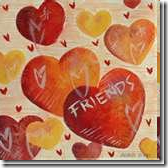
Your phantasy is the limit! How about this card with a quilled flower, using the Loire Valley kit:

Just like I did with the butterfly I printed a brush to use as a model. I quilled the six separate petals first. First, I attached three of these together, then made another layer with the other three and glued one layer on top of the other to make it more dimensional. The blue background is a paper from the kit, printed with a brush from the Love brush kit. The black frame came from the Elements set. There were already some drawn stitches on this frame. I handstitched these with real thread first (also for more dimension) before I glued the frame on the background with some foam tape. I also printed the red colored flower from the Elements set in the same size as my quilled flower. I attached my quilled flower on top of it and glued it on the frame on the card.

I used these quilled flower and butterfly on a card. Of course, you can create these also to finish your layouts. I would love to hear if I got you inspired and if you want to start quilling right a way! I would love it even more if you link your quilling project to the comment section of this blogpost!!

Have a nice day!!

Sandra

maandag 26 april 2010

The Color Room #3: DIVA licious

For the latest color palette at The Color Room I made a digital layout.
This is the color palette:
And this is my layout:

I used an old template from my digital stash this time, from GM Designs 2006.
I also used papers and elements from two kits, the Mariposa kit and the Bug-a-Boo Kind of Love kit.
And the pictures I used are old too...september 2006...when I had a photoshoot with Danique, at the age of five! Ok, almost six years old...she looks so pretty at these pictures!...She still does....

Sandra

dinsdag 20 april 2010

Gorgeous RAK by Tracie Hudson!

I was just bloghopping and reading Tracie Hudson's newest blogpost with a lot of gorgeous layouts and boom!...at the end of the blogpost she suddenly is giving away a gorgeous RAK, with a Pencil Lines Sketch Book and some Cosmo Cricket Material Girl goodies!!! Of course I would love to win these!!!
If you want a chance to win too...go check it out here!

Sandra

maandag 19 april 2010

TCR#2: My love My life

As I wrote in a previous blogpost I found out about The Color Room, with a new color combination each week to challenge us.
This is the color palette of this week:
Absolutely not my colors, although I like this combination very much! But I had a hard time searching in my stash to find some matching papers...I had the perfect picture in just the right colors too.
This is my layout:
I wanted to make a male layout but no rough and tough layout, just manly, masculine, etc. So I decided to create my own flowers with the patterned paper I used on my layout. No cardstock roses...that would be too feminine. I think the flowers I created now are pretty manly, don't you?
Here is a more detailed picture:

By the way, the white and blue hydrangea flowers are from Prima.
I used my graphite and blue glimmermist too, with a Tim Holtz mask.
The patterned paper is from Kaisercraft (Pack your bags), from Pink Paislee and from My Mind's Eye.

I'm very happy about the result. Can't wait to start with the next color palette!

Sandra

vrijdag 16 april 2010

The Color Room: #1 Sweet

Thanks to the blog of Ingvild Bolme I found out about a complete new Ning network: The Color Room ! This is such an amazing place to wander around for inspiration and of course..to join all those great scrappers from all around the world! They have a new Color Palette every Friday and an extremely amazing designteam!
Last week they had their first Color Palette...
They even provide a sketch to get you started!
I got so inspired that I created my first canvas:

I painted several layers of gesso, blue and white acrylic paint, added some old bookpages and stamped with bubble wrap to create the background. (Nice detail: the old bookpages came from a swedish book which we bought at a flea market in Sweden on the day the picture was taken.)
I also used my Prima Marketing scraps again. I loved how the horn (is this the right word??) of Laura's icecream comes back in the papers (...although I'm sure Prima has probably never thought about this similarity..). I painted the chipboard letters with silver acrylic paint and traced them with a brown marker to make them more pop. And I used the beautiful vine of Prima of course...can you believe that this vine belonged to my scraps after two layouts and a card?!! It was probably waiting for my canvas!

Color palette #2 is already up now in The Color Room. Why don't you just take a look and give it a try?

Sandra

donderdag 15 april 2010

Colorful snow challenge at De Scrapheap...and I won!

Last March I submitted a layout to the challenge 'Colorful Snow' at the forum of De Scrapheap.
The rules said that I wasn't allowed to show my layout on my own blog until the challenge was over. Now it is...so now I can show you!
The challenge was to scrap a snow picture (after this winter I have lots of them!) but you had to use bright colors. The second restriction was that you could use as much patterned papers, embellishments etc. as the number of pictures you used. I used only one picture so I had to use only one patterned paper, one flower, one rub-on, one stamp, etc.
Here is my layout:
I used a patterned paper from Blond Moments, one word in chipboard for the title, one Prima flower, one flower shaped rhinestone, one button, one brad, one eyelet, one phototurn, my Prima script stamp, a felt snowflake (which I painted green!) and a rub-on. I stitched a little bit freestyle in green. On the background I sprayed with my new glimmermist (color: SWAK) using a snowflake mask.
And you know what the best part is? I won the challenge!!! I had so much fun doing this challenge and as a bonus I got a gift certificate to shop in their store! I'm so happy!!!

Have a nice day!

Sandra

woensdag 14 april 2010

My first Card Sketch Challenge!

Thanks to Sandra I found out that Dolls and Decorations started their own blog. I knew that they had a webstore already and a messageboard with a lot of active members. Because I'm already a member of several messageboards I thought it would be better for me not to join this one also...It takes so much time to keep up with all the messages... But I love the possibility of following them via their new blog!
Reading their blog I found out about this Card Sketch challenge and since I was so eager to use my scraps of the Prima stuff after the workshop with Tracie Hudson last weekend I decided to try this sketch. I'm starting to like making cards more and more, especially after I made a lot of hybrid cards recently for Kaisercraft Digital. (Don't forget to check next Friday's blogpost at the Kaisercraft blog...Friday Focus on Digital..my cards will be featured then!)
For this card I tried some Tim Holtz techniques for the first time too...I played with my glimmermist and distressink on the square in the middle. The text 'Special Day' was printed first, then I masked it with the same text but then cut out. I stamped the square with my new Prima script stamp. (Love it!)
A lot of my blogreaders will probably say that this card is 'so not my style' and that is true. And that is why I had so much fun making it! The bright colored, less romantic cards will follow another day..don't worry! My head is overflowing with inspiration right now..just need the time to let it all out!!
Here is my card:
Have a nice day!

Sandra

zondag 11 april 2010

Workshop with Tracie Hudson!

I went to a workshop at Paper & Pictures yesterday, with Prima Marketing Educator Tracie Hudson. She is also in the DT of Prima and I love her work for Pencil Lines! So as soon as I saw she was teaching here in The Netherlands I knew I wanted go to one of her workshops. She was teaching two different classes, one about making a mini-album and one about making two layouts. I chose the layouts class. (Of course, I would have loved to do both but my scrap budget didn't allow me...unfortunately..)
It was my first workshop ever! I just never got to the point of going to a workshop before due to all sorts of reasons. But now I finally did...and I'm sure I will do it more!
I didn't make it to finish both layouts during the class...didn't want to either, because I didn't want to rush and create something that wasn't perfect in my eyes. I also wanted to enjoy the feeling of working with these gorgeous products a little bit longer! It doesn't happen to me a lot, having all these little treasures together at once at my dinner table!!! And to be able to work with these is only a bonus!!
So I finished both layouts this morning. This is the first one, about my endless love...my hubby and me:
Some details:

I used a Martha Stewart border punch on this one. I had never worked with these before, but now I love them! I bought one directly after the workshop...Now I understand why these border punches are so popular because the effects are really nice. Apparently I had to experience this first before I was convinced. (This happens to me a lot!)
The title words 'Special Moments' were already printed on the paper. I just traced them with a black marker to make the letters pop up some more.
The picture is matted on a piece of the packaging of the red flowers. Prima did some really good thinking about re-using the packaging here by printing some words on the plastic first!

Don't you just love all the gorgeous flowers? And how about those ribbons?
It must be forbidden to make these gorgeous products! How on earth am I gonna resist these the next time I'm in a scrapstore???!!!

Here is my second layout. I used a picture of my parents, on their weddingday, 45 years ago...which also explains the title..the year 1965.

And again..some details:

I love these 'swirls with pearls'. I cut one in pieces before I attached these under the flowers.
Did you notice the tiny green roses that Prima added to these wonderful swirls?

Between all those gorgeous products we got for this class was also a vine with flowers and lovely pink birds. I cut them of the vine and attached them on my layout, just like I did with some of the small flowers.
(Thanks so much for all the inspiration, Tracie!!!!)

I definitely got my paperscrap mojo back after all the digital scrapping I did last week!
I hope to show you some more with the scraps of my kit soon...

Sandra

Devonshire goes digital and a Saturday Sketch

I have been doing a lot of digital layouts this week. I didn't only scrap annther four layouts with the Springfaeries kit..can't show you yet...but I did also a layout for the Saturday Sketch at Kaisercraft, with Leah's template.
Here is my layout:
I used the Camp Stoneybrook kit for this one.

Every Friday Kaisercraft is having a 'Focus on Digital' on their blog. For this weeks post I played with a free printable of their newest Q3 papercollection, which can be downloaded from their site. This printable was made to be used as an addition to you paperlayout, but I used it to make a digital layout with it...just for fun, to see if it was possible!
This is the printable:
 
And this is my layout with it:

By the way, I combined it with some elements from the Amour kit.

Sandra

dinsdag 6 april 2010

Do you believe in fairytales?

I couldn't resist this wonderful digital kit, called Spring Faeries which I bought at Oscraps.com ! Yes, I bought another digital kit instead of spending my money on real papers or die cuts or whatever....This kit is loaded with elements like toads and turtles with saddles, little mushroom houses, wings, beautiful flowers, mystic backgrounds etc. Creating layouts with this kit is so great! It has nothing to do with the reason why most people scrap: preserving memories. This is all about creating little new fairytales, with your own kids in it!

I used this picture:
It is a picture of Laura at the age of one and a half...dreaming...while my hubby secretley took the picture with the camera, standing on the table.
And this is the layout I made with it:
 

Is this cute or what?! I love it!!

Sandra

maandag 5 april 2010

Sketchy Thursdays #4.1: Summertime Girl

I had so much fun with my new digital kit I bought yesterday that I made another layout today..and I'm sure it will not be the last one with this kit. By the way, I need to give the designer some credit here because she did a great job. I used the Mariposa kit by Julie Billingsley. The sketch came from the newest challenge at Sketchy Thursdays and this is my layout:

The cute girl in the picture is my daughter Danique at the age of four..and a half!..

Have a nice day!
Sandra

zaterdag 3 april 2010

Digital Saturday: You sparkle

When I woke up this morning I already felt like doing 'something digital'...and as soon as I started my computer I got an newsletter from Sweet Shoppe Designs, with a sale and some new releases. Normally I don't buy digital kits because I have so many to choose from as a Digital CT member at Kaisercraft. Now I wanted to try something different. Kaisercraft hasn't released a digital kit for a long time now and I just didn't feel like working with these kits today. (By the way, I did a lot of hybrid scrapping with the Kaisercraft kits the past two weeks, but I cannot show you yet!)
So I decided to shop at Sweet Shoppe Designs...really, I couldn't choose! So much great digital stuff!
I bought a digital kit in my favourite bright colors, like orange, lime, aqua and lots of flowers and bling. Although I can make my own templates now, I can't do it as good as their designers..yet..and I loved the templates I saw in the shop..so why shouldn't I buy these?
Here is the layout I created today with my new kit and template:
I had these pictures in my stash since last summer..waiting to be scrapped. And finally I did! You know, you can get so much more out of a picture when you digiscrap it?! If I had used this picture on a paper layout I wouldn't haven been able to resize it over and over again, like I did now. I would probably have printed it in 4x6 inch size and see what came out of it.
I love how it turned out now! Can't wait till I have some time to play around some more with this kit.

Sandra

donderdag 1 april 2010

Published!!...and GDT!!

Today may be April 1 but this blogpost is certainly not a joke...I'm so proud of myself!
Let's start with this: two of my layouts, a digital one and a traditional one, are published in ScrapStreet.com Magazine in this month's issue.
Curious? Check it out here! Page 11 and 13!

Second...Creative Scrappers started with the celebration of their second anniversary today. I was chosen to be one of their Guest Designers. Today they started with a sketch reveal...and my layout was featured there.
Again..I'm so proud and it is so cool to see my work out there!
This is my layout:
I used my Bella Blvd papers again...I love these colors!
The picture is an official one of my youngest daughter Laura, at the age of one. I remember we had to wait at least half an hour before it was our turn for the photoshoot..which is a long time when you are one, wearing a white dress, can't walk (only crawl) and having a mom who wants you to stay clean for this picture! The look on her face says it all: ok mom, I will sit pretty and can we go get that icecream now?!
By the way, I stitched the picture on a piece of my son's jeans and distressed the edges. Thought it would fit the jeans jacket of Laura so well.

And last but not least...my publications in Kaisercraft's Q3 magazine. The mag was already out in January but I only got it a few weeks ago. I had forgotten to show you..so here it is:


Have nice day!

Sandra